一 tensorflow2读取图片
1.1 读取单个文件
import tensorflow as tf |
关键API说明
- tf.io.read_file(filename) 用来读取文件。
- tf.image.decode_jpeg(contens) 将图片文件解码为张量,这里是jpg格式,其他的格式也在tf.image模块中。
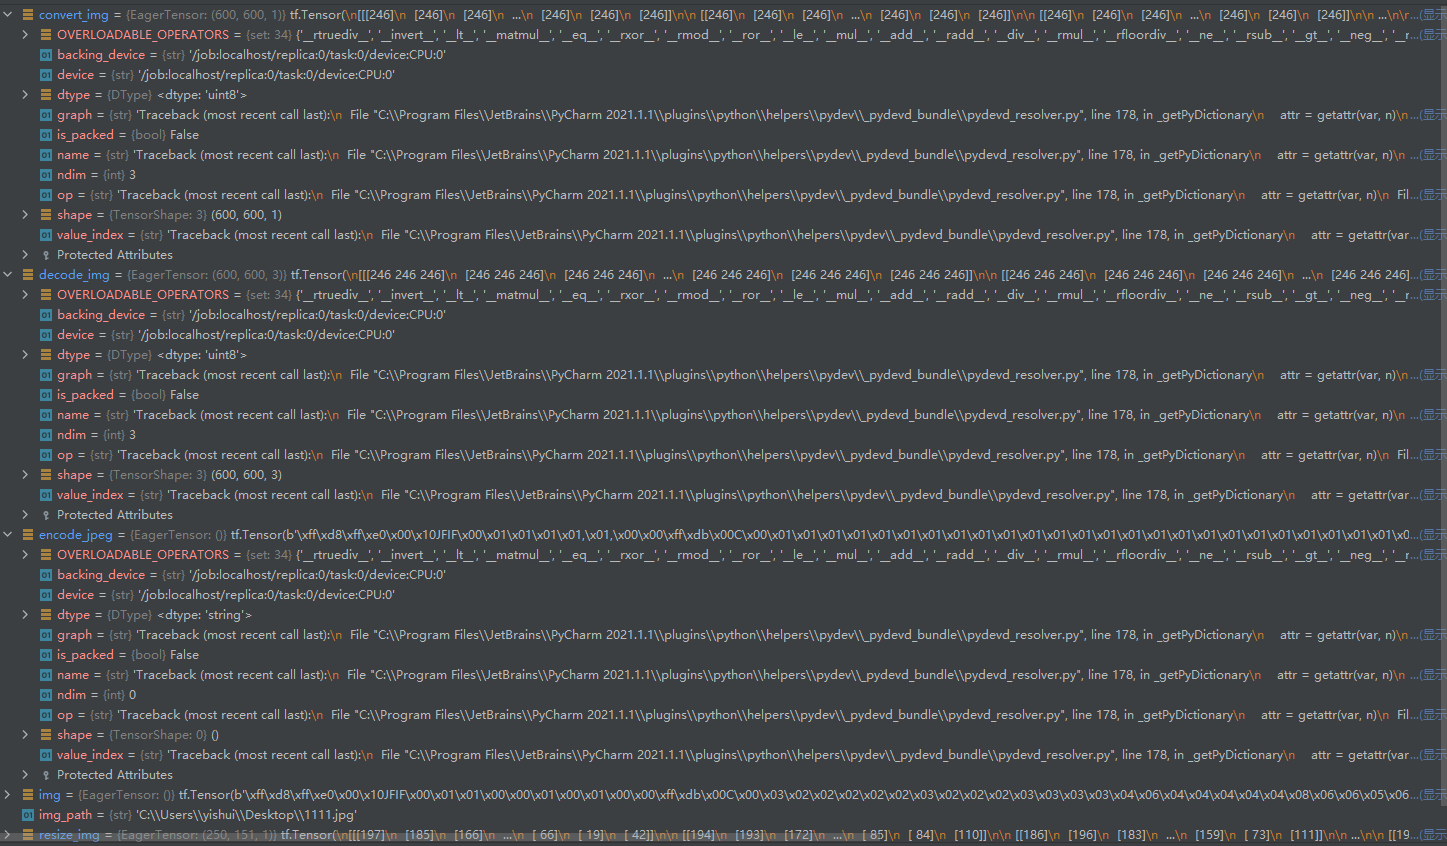
运行结果为
读取的原始图片的类型为 <class 'tensorflow.python.framework.ops.EagerTensor'> 形状为 () 数据类型 dtype: <dtype: 'string'> |
1.2 批量读取文件
import tensorflow as tf |
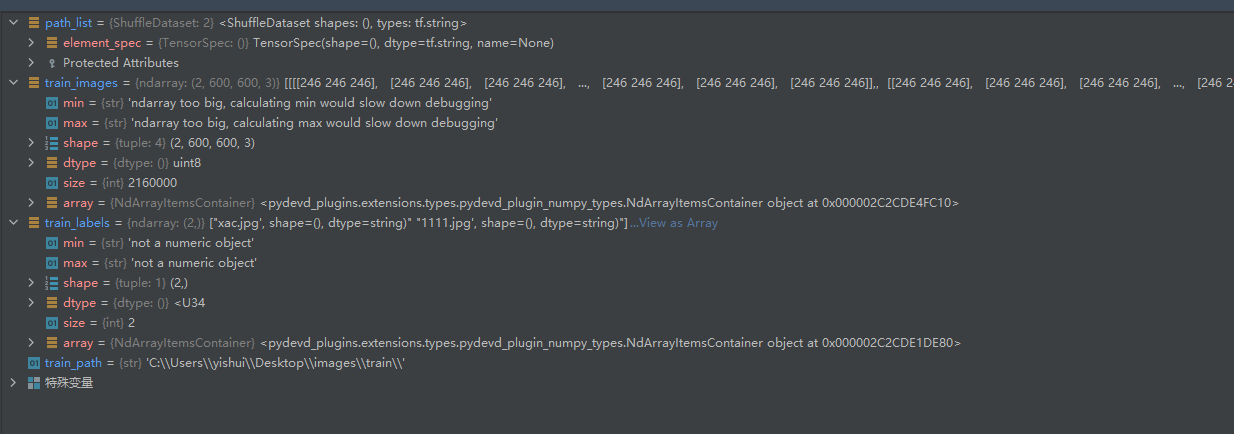
运行结果为
读取的图片的类型为 <class 'numpy.ndarray'> 形状为 (2, 600, 600, 3) 数据类型 dtype: uint8 |
说明:
在文件夹C:\\Users\\yishui\\Desktop\\images\\train\\里只有两个图片
1.3 使用keras读取图片
image_size = (180, 180) |
二、图片数据增强
2.1 基础使用
在读入数据之后,数据可能需要做一下强化操作,这些操作可以增加模型的泛性,同时可以扩大我们的数据集,常见的数据强化操作如下:
- 旋转 | 反射变换(Rotation/reflection): 随机旋转图像一定角度; 改变图像内容的朝向;
- 翻转变换(flip): 沿着水平或者垂直方向翻转图像;
- 缩放变换(zoom): 按照一定的比例放大或者缩小图像;
- 平移变换(shift): 在图像平面上对图像以一定方式进行平移;可以采用随机或人为定义的方式指定平移范围和平移步长, 沿水平或竖直方向进行平移. 改变图像内容的位置;
- 尺度变换(scale): 对图像按照指定的尺度因子, 进行放大或缩小; 或者参照SIFT特征提取思想, 利用指定的尺度因子对图像滤波构造尺度空间. 改变图像内容的大小或模糊程度;
- 对比度变换(contrast): 在图像的HSV颜色空间,改变饱和度S和V亮度分量,保持色调H不变. 对每个像素的S和V分量进行指数运算(指数因子在0.25到4之间), 增加光照变化;
- 噪声扰动(noise): 对图像的每个像素RGB进行随机扰动, 常用的噪声模式是椒盐噪声和高斯噪声;
- 错切变换(shear):效果就是让所有点的x坐标(或者y坐标)保持不变,而对应的y坐标(或者x坐标)则按比例发生平移,且平移的大小和该点到x轴(或y轴)的垂直距离成正比。
tensorflow的图片强化API需要一下的类及类的方法,对应的API如下:
用来创建一个图片数据集迭代器,可以在传入数据时进行一些数据加强操作
|
- rescale:缩放因子,图像像素值乘以rescale,如果为255可以将像素值归一到0-1区间。
- featurewise_center:特征均值化,若为True,对输入的图片每个通道减去每个通道对应均值,与rescale=1/255相同。
- samplewise_center:样本均值化。
- rotation_range:随机旋转角度范围
- zca_epsilon:ZCA 白化的 epsilon 值,默认为 1e-6。
- zca_whitening: 布尔值。是否应用 ZCA 白化。
- rotation_range: 整数。随机旋转的度数范围。
- width_shift_range:随机宽度偏移量
- height_shift_range:随机高度偏移量
- zoom_range:随机缩放,范围[1-n,1+n]
传入图片数据集,传入之后会按照设定好的对图片进行处理
|
- x: 样本数据。维度4,即(batch,width,height,channel)的格式。对于灰度数据,channel的值应该为 1;对于 RGB 数据,channel值应该为 3。
- augment: 布尔值(默认为 False)。是否使用随机样本扩张。
- rounds: 整数(默认为 1)。如果数据数据增强(augment=True),表明在数据上进行多少次增强。
- seed: 整数(默认 None)。随机种子。
注意:这一步并不是必须的,当ImageDataGenerator构造函数中需要使用featurewise_center: samplewise_center: featurewise_std_normalization: samplewise_std_normalization:这几个参数时才需要使用fit方法,因为需要从fit方法中得到原始图形的统计信息,比如均值、方差等等,否则是不需要此步骤的。
采集数据和标签数组,生成批量增强数据迭代器,最好按照需要设定batch。
|
- x: 输入数据。秩为 4 的 Numpy 矩阵或元组。如果是元组,第一个元素应该包含图像,第二个元素是另一个 Numpy 数组或一列 Numpy 数组,它们不经过任何修改就传递给输出。可用于将模型杂项数据与图像一起输入。对于灰度数据,图像数组的通道轴的值应该为 1,而对于 RGB 数据,其值应该为 3。
- y: 标签。
- batch_size: 整数 (默认为 32)。
- shuffle: 布尔值 (默认为 True)。
- sample_weight: 样本权重。
- seed: 整数(默认为 None)。
- save_to_dir: None 或 字符串(默认为 None)。这使您可以选择指定要保存的正在生成的增强图片的目录(用于可视化您正在执行的操作)。
- save_prefix: 字符串(默认
'')。保存图片的文件名前缀(仅当save_to_dir设置时可用)。 - save_format: “png”, “jpeg” 之一(仅当
save_to_dir设置时可用)。默认:”png”。 - subset: 数据子集 (“training” 或 “validation”),如果 在
ImageDataGenerator中设置了validation_split。
注意:flow()生成的迭代器是无限的,且是只能用model.fit_generator()将训练数据传入模型中训练。
import tensorflow as tf |
2.2 图片预处理
缩放图片
import tensorflow as tf |
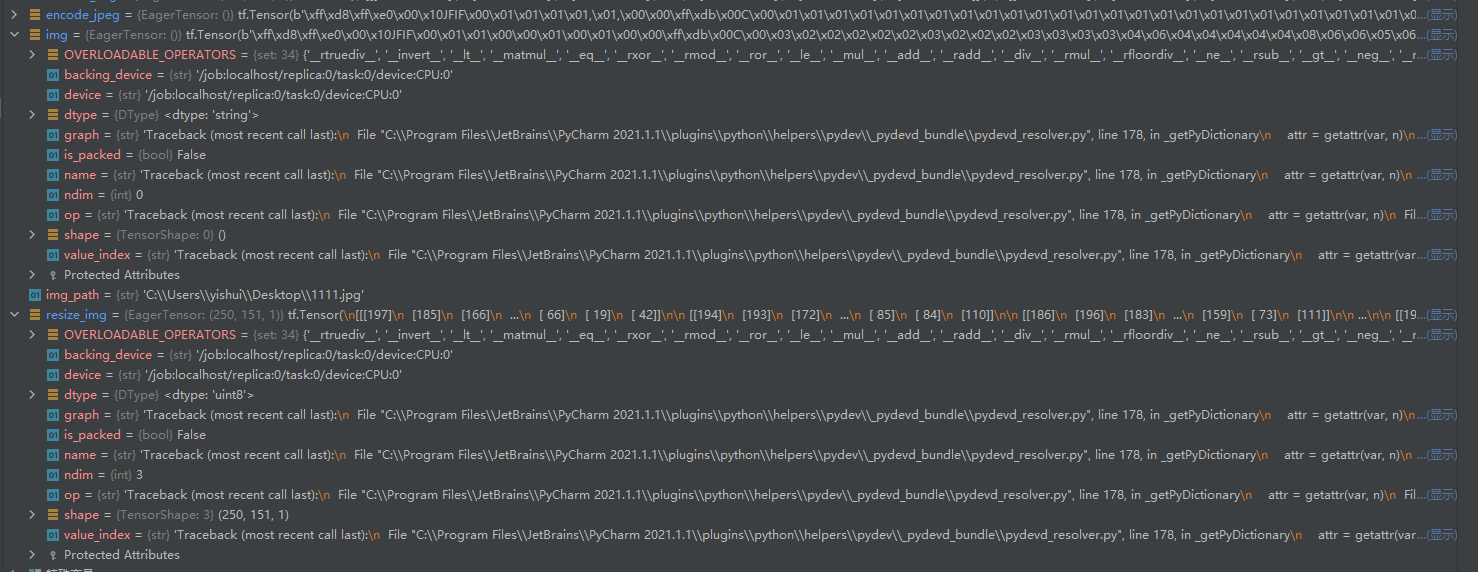
运行结果为
当前的tensorflow版本为 2.5.0 |
三 使用Keras API对数据进行预处理
在TensorFlow2.0的高级API Keras中有个比较好用的图像处理的类ImageDataGenerator,它可以将本地图像文件自动转换为处理好的张量。
from tensorflow.keras.preprocessing.image import ImageDataGenerator |
其中重要的API说明
ImageDataGenerator是tensorflow.keras.preprocessing.image模块中的图片生成器,同时也可以使用它在batch中对数据进行增强,扩充数据集大小,从而增强模型的泛化能力。
ImageDataGenerator中有众多的参数,如下:
tf.keras.preprocessing.image.ImageDataGenerator( |
参数如下
featurewise_center:布尔值,使输入数据集去中心化(均值为0)
samplewise_center:布尔值,使输入数据的每个样本均值为0。
featurewise_std_normalization:布尔值,将输入除以数据集的标准差以完成标准化。
samplewise_std_normalization:布尔值,将输入的每个样本除以其自身的标准差。
zca_whitening:布尔值,对输入数据施加ZCA白化。
rotation_range:整数,数据增强时图片随机转动的角度。随机选择图片的角度,是一个0180的度数,取值为0180。
width_shift_range:浮点数,图片宽度的某个比例,数据增强时图片随机水平偏移的幅度。
height_shift_range:浮点数,图片高度的某个比例,数据增强时图片随机竖直偏移的幅度。
shear_range:浮点数,剪切强度(逆时针方向的剪切变换角度)。是用来进行剪切变换的程度。
zoom_range:浮点数或形如[lower,upper]的列表,随机缩放的幅度,若为浮点数,则相当于[lower,upper] = [1 - zoom_range,1+zoom_range]。用来进行随机的放大。
channel_shift_range:浮点数,随机通道偏移的幅度。
fill_mode:‘constant’,‘nearest’,‘reflect’或‘wrap’之一,当进行变换时超出边界的点将根据本参数给定的方法进行处理。
cval:浮点数或整数,当fill_mode=constant时,指定要向超出边界的点填充的值。
horizontal_flip:布尔值,进行随机水平翻转。随机的对图片进行水平翻转,这个参数适用于水平翻转不影响图片语义的时候。
vertical_flip:布尔值,进行随机竖直翻转。
rescale: 值将在执行其他处理前乘到整个图像上,我们的图像在RGB通道都是0255的整数,这样的操作可能使图像的值过高或过低,所以我们将这个值定为01之间的数。
preprocessing_function: 将被应用于每个输入的函数。该函数将在任何其他修改之前运行。该函数接受一个参数,为一张图片(秩为3的numpy array),并且输出一个具有相同shape的numpy array。
train_datagen.flow_from_directory( |
参数如下
directory:目标文件夹路径,对于每一个类,该文件夹都要包含一个子文件夹。
target_size:整数tuple,默认为(256, 256)。图像将被resize成该尺寸
color_mode:颜色模式,为”grayscale”和”rgb”之一,默认为”rgb”,代表这些图片是否会被转换为单通道或三通道的图片。
classes:可选参数,为子文件夹的列表,如[‘smile’,‘neutral’],默认为None。若未提供,则该类别列表将从directory下的子文件夹名称/结构自动推断。每一个子文件夹都会被认为是一个新的类。(类别的顺序将按照字母表顺序映射到标签值)。
class_mode: “categorical”, “binary”, “sparse”或None之一。默认为”categorical。该参数决定了返回的标签数组的形式,”categorical”会返回2D的one-hot编码标签,”binary”返回1D的二值标签。”sparse”返回1D的整数标签,如果为None则不返回任何标签,生成器将仅仅生成batch数据。
batch_size:batch数据的大小,默认32。
shuffle:是否打乱数据,默认为True。
seed:可选参数,打乱数据和进行变换时的随机数种子。
save_to_dir:None或字符串,该参数能让你将数据增强后的图片保存起来,用以可视化。
save_prefix:字符串,保存数据增强后图片时使用的前缀, 仅当设置了save_to_dir时生效。
save_format:“png”或”jpeg”之一,指定保存图片的数据格式,默认”jpeg”。
四 使用自定义图片训练
4.1 下载数据集
本教程使用了大约3700张鲜花照片的数据集。数据集包含5个子目录,每个类一个子目录
flower_photo/ |
代码如下
import matplotlib.pyplot as plt |
运行结果为
1853 |
查看其中一张图片
4.2 创建一个数据集
让我们使用有用的image_dataset_from_directory实用程序从磁盘加载这些图像,只需要几行代码就能将磁盘上的图像转换到 tf.data.Dataset
定义一些加载参数
batch_size = 32 |
在开发模型时使用验证分离是一种很好的做法。让我们使用80%的图像进行训练,20%用于验证。
train_ds = tf.keras.preprocessing.image_dataset_from_directory( |
运行结果为
Found 1853 files belonging to 3 classes. |
4.3 数据可视化
打印数据
for image_batch, labels_batch in train_ds: |
运行结果为
image_batch.shape (32, 180, 180, 3) |
4.4 为训练配置数据集
让我们确保使用缓冲预取,这样就可以从磁盘生成数据,而不会使I/O阻塞。这是加载数据时应该使用的两种重要方法。
Dataset.cache()将图像在第一个历元期间从磁盘加载后保存在内存中。这将确保数据集在训练模型时不会成为瓶颈。如果数据集太大,无法放入内存,也可以使用此方法创建性能磁盘缓存。
prefetch()与训练时的数据预处理和模型执行重叠。
AUTOTUNE = tf.data.AUTOTUNE |
4.5 数据标准化
RGB通道值在[0,255]范围内。这对神经网络来说不理想;一般来说,您应该尽量使输入值变小。在这里,您将使用重新缩放层来标准化要在[0,1]范围内的值。
|
4.6 创建模型
该模型由三个卷积块组成,每个卷积块中有一个最大池层。有一个完全连接的层,上面有128个单元,由relu激活功能激活。此模型尚未针对高精度进行调整,本教程的目标是展示标准方法。
num_classes = 5 |
4.7 编译模型
选择optimizers.Adam optimizer和loss.SparseCategoricalCrossentropy loss函数。要查看每个训练历元的训练和验证精度,请传递metrics参数。
model.compile(optimizer='adam', |
查看模型
model.summary() |
运行结果为
Found 1853 files belonging to 3 classes. |
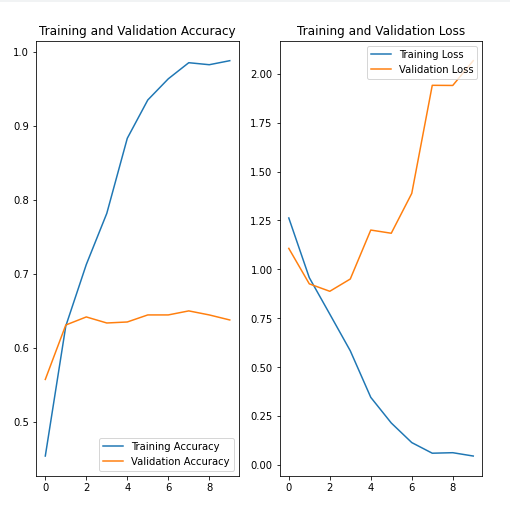
4.8 训练模型
epochs=10 |
查看训练结果
acc = history.history['accuracy'] |
五 预测自定义图片
5.1 保存模型
import tensorflow as tf |
5.2 使用模型
import tensorflow as tf |
运行结果为
|
六 向量修改
6.1 np.expand_dims 增加维度
import numpy as np |
运行结果为
|
6.2 tf.expand_dims 增加维度
import tensorflow as tf |
运行结果为
|
6.3 numpy.squeeze 减少维度
numpy.squeeze(a,axis = None) |
从数组的形状中删除单维度条目,即把shape中为1的维度去掉
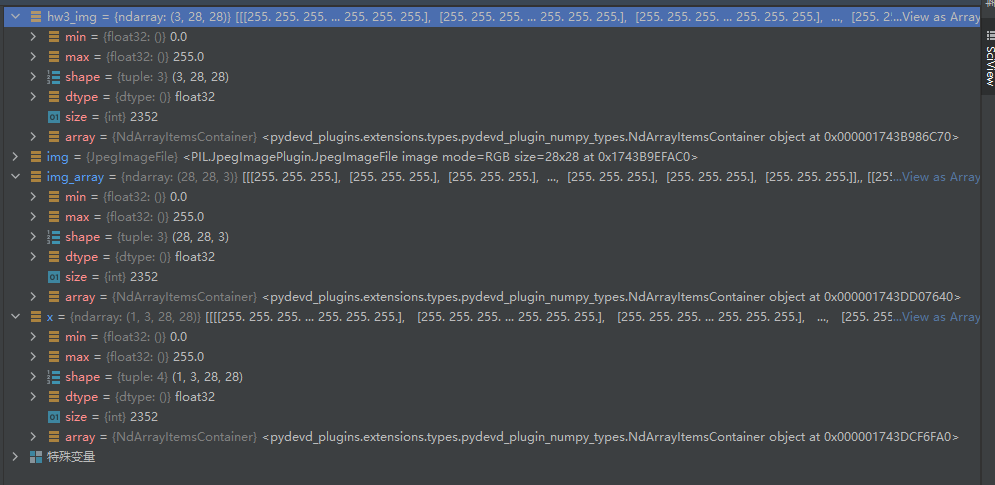
6.4 图片属性修改
原始图片= = = > [H, W, 3] = = = = = > [N, C, H, W]
import matplotlib.pyplot as plt |
运行结果如下
原始图片数据为 <PIL.JpegImagePlugin.JpegImageFile image mode=RGB size=28x28 at 0x1743B9EFAC0> |
数据属性
七 重要的图片处理API
解码为tensor格式# 解码为tensor格式
_img = tf.image.decode_jpeg(_img)
将图片转换问灰度图片,即最后一维只有1# 将图片转换问灰度图片,即最后一维只有1
_img = tf.image.rgb_to_grayscale(_img)
剪裁图片, 高度和宽度
|
缩放图片
|